In the actual preparation of metallographic samples, we often encounter situations such as plating, infiltration, coating or multi-thin-layer composite. In this case, we need the edge of the sample to be well protected during the grinding and polishing process so as not to produce sample preparation defects such as rounding, falling off, and delamination. Because this will lead to inaccurate measurement of coating thickness and misreading of tissue, which will lead to failure of sample preparation.
P1 Gap between sample and resin
The elasticity of the sandpaper and polishing cloth will make the above defects especially apparent when the sample is a free surface. It is therefore necessary to create continuity on the sample surface to resist the microscopic undulations of the sandpaper and polishing cloth caused by the free surface of the sample. In order to make the free surface of the sample continuous, if the shape of the sample is regular (such as a square), mechanical clamps can be used to clamp and fit the surface of the sample to be protected. However, this method is only suitable for samples with excellent surface flatness and roughness, because the fixture is a rigid plate, and when the sample surface is uneven or there are large microscopic grooves, a part of the surface will still be in a free state. Putting aluminum foil between the sample and the fixture may improve this situation, but if the hardness is not well matched, it will still bring some troubles to the subsequent grinding and polishing. However, when the shape of the sample is irregular or soft (such as plastic and its plastic coating), this method fails, and this kind of fixture cannot be automatically ground and polished.

P2 Mechanical clamping method
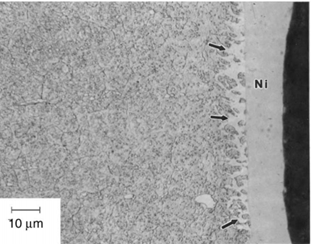
In addition, electroplating protection on the surface of the sample is also an effective means. However, this method also shows its limitations when there is no obvious contrast between the electroplated layer and the surface layer of the sample under the light microscope. Not only that, it is even more unacceptable that the protective coating may have a penetration and diffusion reaction with the surface of the sample. Due to the complicated operation, this method has also been limited in practical application.
P3 Penetration of the nickel-plated protective layer
At present, the mainstream inlay method on the market is plastic package inlay. According to whether there is an external heat source and the curing mechanism, it can be divided into hot mosaic method and cold mosaic method.
Hot mounting
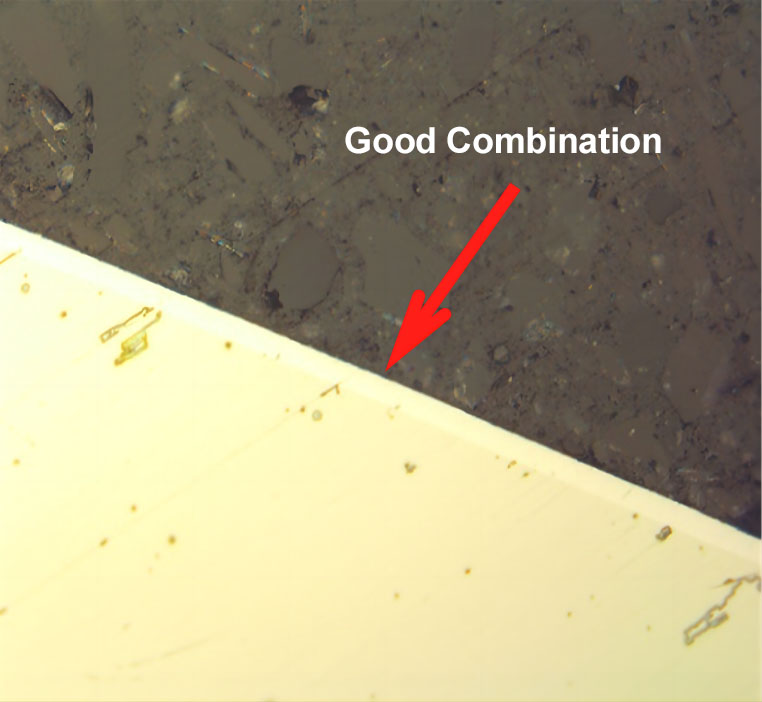
There is a specially prepared epoxy resin material in thermal mounting, which has edge retention.亦Good chemical bonding occurs with the edge of the specimen as the resin cures. This combination eliminates the gap between the resin and the sample, and the filler with a certain hardness matches the hardness of the sample well. Excellent protection of specimen edges during grinding and polishing.
P4 Use edge-preserving mosaic, good combination
The edge retention of hot mounting can be improved by the following measures:
(1)Before the sample is hot-mounted, foreign matter such as grease, dirt and scale on the surface of the sample should be removed, so that the resin can directly contact the real surface of the sample during hot-mounting.
(2)Spraying the release agent on the upper and lower anvils and the sleeve wall of the hot mounting is also helpful to improve the edge retention of the epoxy resin, because the resin shrinks during the cooling stage If the resin adheres to the sleeve wall , it is bound to produce a tensile stress in the diameter direction of the sample, which may be large enough to pull away from the bonding surface of the resin and the sample under suitable conditions.
(3)Use a lower cooling rate, because in the rapid cooling mode, the outer surface and core of the sample have a large temperature gradient due to the difference in heat dissipation efficiency, and this temperature gradient will cause large uneven resin shrinkage. Under the action of stress, the resin and the sample are separated. At a lower cooling rate, the temperature difference between the inside and outside of the sample is not large, the thermal stress is small, and it is not easy to separate the sample from the resin.
(4)When the sample has a closed shape or a large enveloping angle, the closed shape should be cut or its enclosing angle should be reduced. Because in the shrinkage stage of the resin, if there is a closed or nearly closed resin island, the resin cannot be "fed" and a gap will appear on the inner surface of the arc.
(5)Try to avoid sharp corners on the observation surface of the sample to prevent the resin from detaching or even cracking due to stress concentration during the shrinkage stage.
(6)When setting hot mounting parameters, try to use the lower limit of resin curing temperature to reduce heat shrinkage, and set a reasonable pressure. In practice, the higher the pressure, the better the edge retention.
(7)It is also possible to wrap a layer of aluminum foil on the surface of the sample and then perform hot mounting. This method works well.
Cold mounting
Cold mounting materials are generally composed of liquid resin plus curing agent or powder plus curing agent, which is characterized in that no external heat source or additional pressure is required during the curing process. So it is especially suitable for samples that are sensitive to pressure and temperature. The edge retention is also different. Generally speaking, the lower the viscosity of the mixed resin, the lower the exothermic peak temperature, and the longer the curing time, the better the edge retention.
The edge retention of cold mounting can be improved by the following measures:
(1)Before the sample is mounted, it is cleaned to remove foreign matter such as grease, dirt and scale on the surface of the sample, so that the resin can directly contact the real surface of the sample during mounting.
(2)Coating the release agent on the mosaic mold will not cause the resin and the sample to be pulled apart due to the tensile stress in the diameter direction caused by adhesion to the mold wall when the resin shrinks.
(3)Try to use low viscosity, low shrinkage, low peak exothermic temperature, and slow curing resin for cold mounting. The acrylic resin system with powder and liquid is not recommended.
(4)After the resin pouring was completed, the samples were placed in a pressure cooker and cured under pressure.
(5)For samples with a sealed shape or a larger enveloping angle, it should be cut and its enveloping angle should be reduced.
(6)The edge preservation of samples with convex and round contours is better than those with concave contours, sharp corners or complex shapes.
(7)Fillers such as ceramic particles are added to the resin to match the hardness of the sample.
Grinding
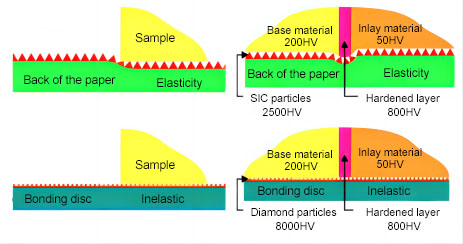
Not only mounting, if you are not careful in the subsequent grinding and polishing process, it will also cause damage and distortion of the edge of the sample. For example, when the sample is ground on a sandpaper with greater elasticity, the soft and hard parts of the edge of the sample will appear embossed. This is because the hardness of general SiC sandpaper is not high. When encountering different soft and hard phases, the hard phase has a stronger cutting resistance, thereby pressing the abrasive particles to the back of the paper;At the same time, the soft phase is continuously cut off by the abrasive particles, and the final cumulative result is that the hard phase protrudes and the soft phase sinks. This is especially noticeable when using unadhesive sandpaper, which, combined with a rigid base, can improve this defect. In view of this situation, a diamond grinding disc or grinding paper with a rigid substrate can be used to solve it. High-hardness diamond particles (8000HV) have consistent cutting force on soft and hard phases, while the rigid substrate provides cutting force so that the coating on the edge of the sample can always be kept on the same plane. When grinding samples that are brittle or contain brittle edges, cushioned resin-based diamond discs perform better than metal-based ones because their grinding properties are less likely to chip away at the edges of brittle materials.
When starting grinding, start with the finest possible abrasive grains. Because coarse abrasive particles are easy to cause embossment and when the grinding medium and the sample move relative to each other, large abrasive particles will cause greater impact and cause brittle materials or the edge of the coating to chip and crack. Aggressive grinding is not recommended, especially for automatic grinding and polishing. It is conceivable that when the automatic grinding is used in the opposite direction, the severe friction will tear the weakly bonded resin from the sample to form a free surface. Therefore, it is recommended to use the same direction mode when grinding.
P5 Anti-relief performance of different grinding media


P6 Comparison of grinding performance of metal-based and resin-based diamond grinding discs
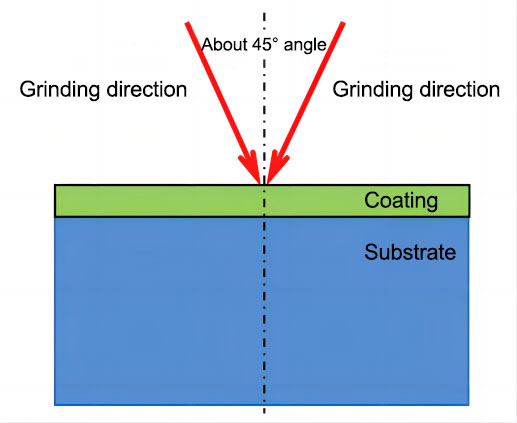
For some coatings that are brittle or easy to fall off, always ensure that the coating is pressed toward the substrate during grinding to prevent the coating and resin from being pulled away from the surface of the sample under the action of friction. For some specific coatings, such as those that are easy to fall off and delaminated, automatic grinding must not be used in the rough grinding stage, and the coating should be manually kept under pressure for grinding. Each scratch intersects at an angle of 45 degrees, and the bisector of the angle is perpendicular to the The edge of the sample (as shown in the image below).
研磨方向 grinding direction
约45°角 about 45° angle
涂层 coating
基体 Substrate
P7 Easy to fall off, layered sample grinding direction
Polishing
In the same principle, embossing occurs due to the different material removal rates of the soft and hard phases at the edge of the sample due to the resilience of the polishing cloth during polishing. Therefore, hard and thin woven cloth should be used with diamond polishing liquid for rough polishing. In some special cases, such as ceramic coatings, due to the large difference in hardness between the substrate and the coating during polishing, a good edge cannot be obtained even with a hard polishing cloth. At this time, the mechanochemical polishing method should be used, that is, the diamond polishing liquid and the silicon dioxide polishing liquid are used together, so that a uniform flat surface including the edge will be obtained. Minimize the time when finishing polishing with a low or medium nap cloth, as napped cloths are more likely to cause embossing.
Epilogue
The method mentioned above should be comprehensively applied to the specific sample to prepare the sample, so that a good sample edge can be obtained.
 英语
英语 西班牙语
西班牙语 德语
德语


.png?imageView2/2/w/400/format/jpg/q/75 "Disposable Sample Cups")
")
")


")


